Claude から接続する
Claude にシフト屋さんを接続すると、話しかけるだけでシフト表を作成・調整できます。 「9月の第1週、早番・遅番・夜勤で4人。夜勤明けは休みにして、夜勤は公平に」のように頼めます。
使っているものを選んでください。
- Claude.ai(Web 版) — API キー不要。おすすめ
- Claude Desktop — 設定ファイルに1行
- Claude Code — コマンド1つ
Claude.ai(Web 版)
ご利用に必要なもの
- Claude のアカウント(無料プランでも利用できます。ただし無料プランで追加できるカスタムコネクタは1つまで)
- シフト屋さんのアカウント(新規登録も可能)
API キーの準備は要りません。接続時に自動で用意されます。
-
Customize → Connectors を開く
Claude の左サイドバーの「Customize」を開き、 設定画面の左メニュー Customize → Connectors を選びます。
Team / Enterprise プランでは、管理者が Organization settings → Connectors で先に追加します。メンバーはその後 Customize → Connectors の「Connect」から接続します。
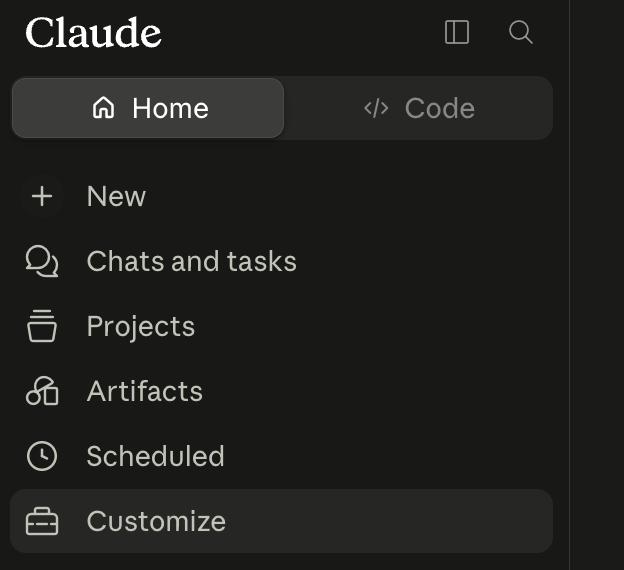
左サイドバーの Customize から入ります。 -
カスタムコネクタを追加
Connectors 画面右上の「Add」から 「Add custom connector」を選び、次の2つを入力して Add を押します。
名前 任意(例: Shiftyasan)。コネクタ一覧に表示されますURL https://api.shiftyasan.com/mcp「Advanced settings」の OAuth Client ID / Secret は空のままにしてください。 どちらも optional で、シフト屋さん側がクライアント登録を自動で行います。
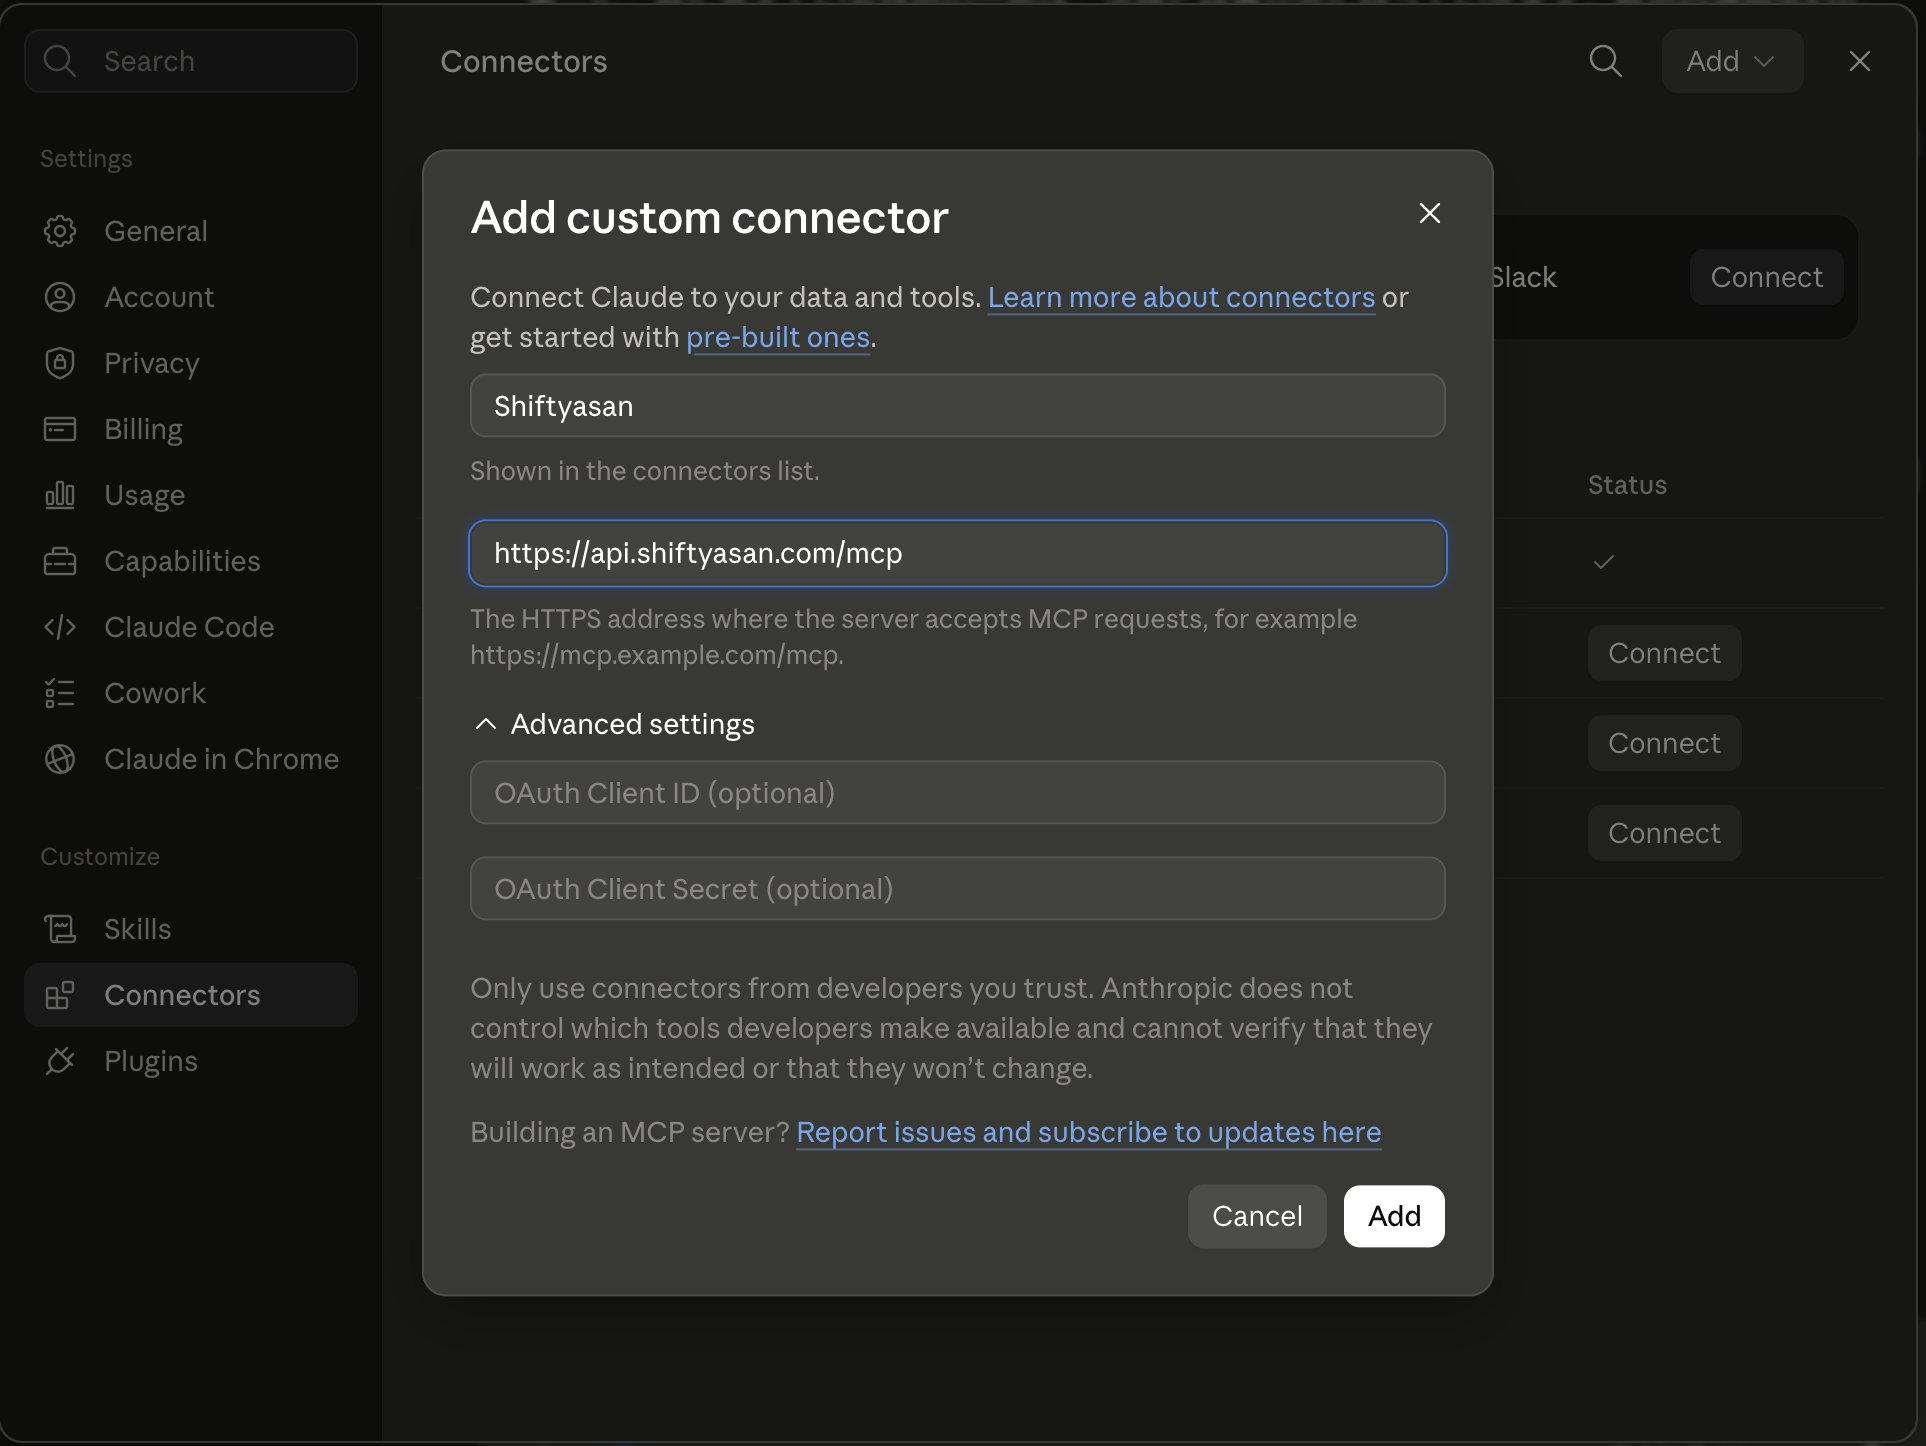
OAuth Client ID / Secret は空のまま Add を押します。 -
シフト屋さんにログイン
ブラウザでログイン画面が開きます。メールアドレスとパスワード、 または Google アカウントでログインしてください。
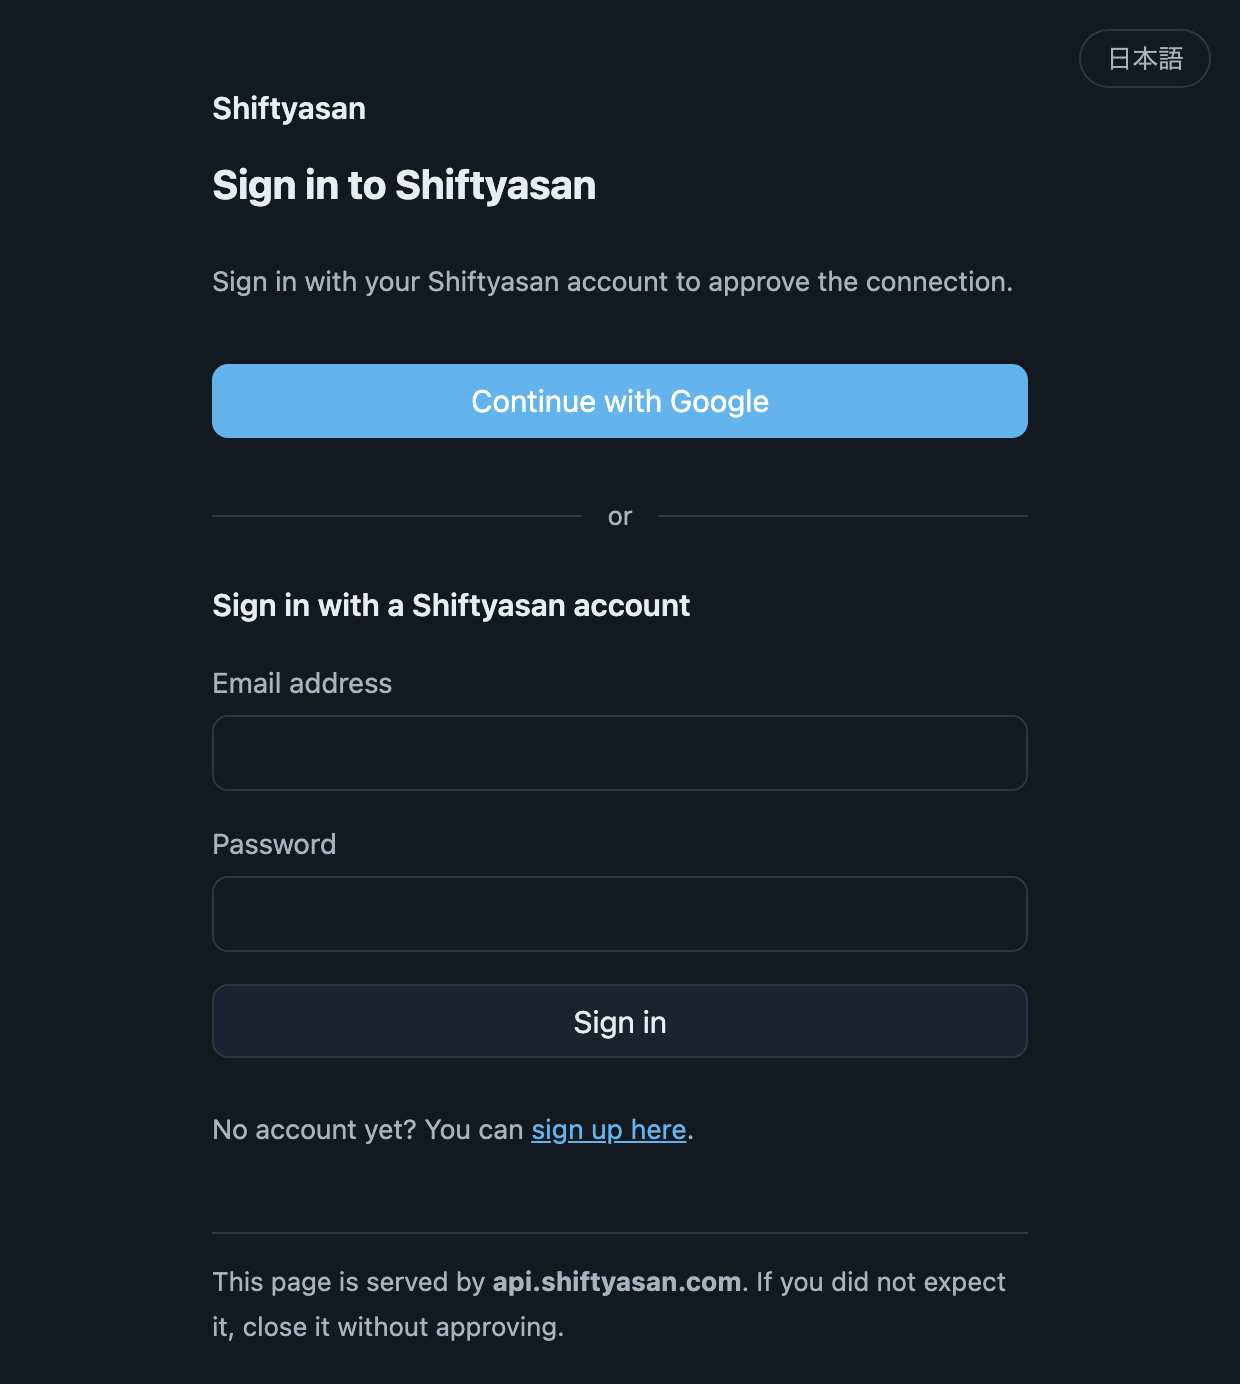
api.shiftyasan.com のログイン画面(英語表示の例)。Google が主経路です。日本語のブラウザでは日本語で表示されます。 -
接続を許可する
許可の画面に、ログイン中のメールアドレスと 接続の許可情報の送り先が表示されます。 どちらも意図したものか確認して「許可する」を押してください。
⚠️ 身に覚えのない送り先が出ている場合は、許可せずに閉じてください。
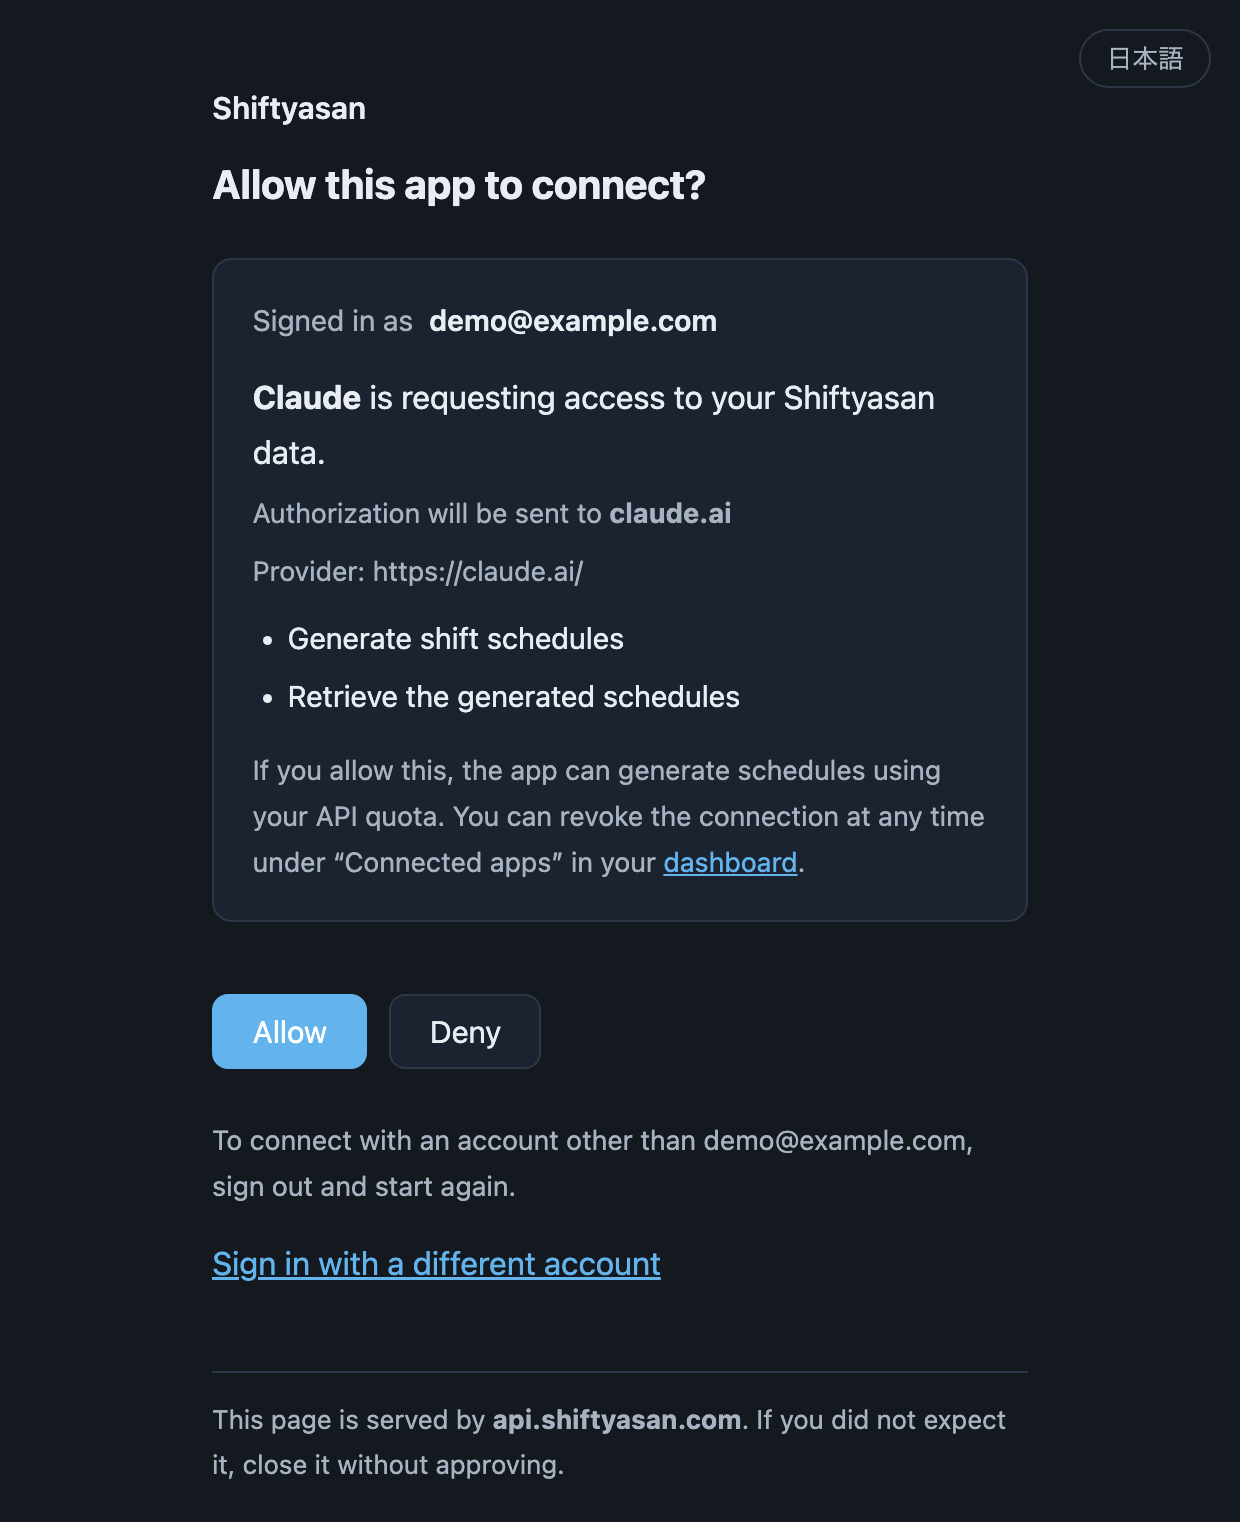
許可画面(英語表示の例)。ログイン中のアカウントと、許可情報の送り先を必ず確認してください。 -
使ってみる
9月1日から7日まで、早番・遅番・夜勤の3種類で
4人のシフトを組んで。夜勤明けは必ず休みにして、
夜勤の回数はできるだけ公平にして。
Claude Desktop
以下は、その方法が使えない場合の代替です。mcp-remote という中継を挟みます。
この方式だけは、お使いの PC に Node.js 20 以上が必要です。
API キーも必要なので、先に
ダッシュボードで発行してください。
設定ファイル(claude_desktop_config.json)に次を追記します。
{
  "mcpServers": {
    "shiftyasan": {
      "command": "npx",
      "args": ["-y", "mcp-remote", "https://api.shiftyasan.com/mcp",
               "--header", "Authorization: Bearer sk_live_..."]
    }
  }
}
追記したら Claude Desktop を再起動してください。
Claude Code
コマンド1つで追加できます。API キーが必要なので、先に ダッシュボードで発行してください。
claude mcp add --transport http shiftyasan https://api.shiftyasan.com/mcp \
  --header "Authorization: Bearer sk_live_..."
うまくいかないとき
設定に「コネクタ」が見当たらない(Claude.ai)
場所は Settings ではなく Customize → Connectors です。 カスタムコネクタは無料プランでも使えます(追加できるのは1つまで)。 Team / Enterprise では管理者が Organization settings → Connectors で追加する必要があります。 手順や対応プランは Claude 側で変わることがあるので、見当たらない場合は Claude のヘルプで最新をご確認ください。
URL を入れるとエラーになる
末尾のスラッシュや余分な空白が入っていないか確認してください。正しくは
https://api.shiftyasan.com/mcp です。
接続はできたのに、シフトを作ってくれない
「シフト屋さんを使って」と明示すると呼び出されやすくなります。 必要な情報(期間・シフトの種類・人数・誰がどのシフトに入れるか)が足りないと エージェントが質問を返すので、埋めていけば作成に進みます。
以前 npm パッケージで設定していた
@shiftyasan/mcp-server の設定はそのまま動きます。
切り替えは必須ではありません。ただしリモート接続なら Node.js が不要で、
更新もこちら側で行われます。
接続を解除するには
ダッシュボードの 「接続しているアプリ」から、いつでも個別に解除できます。 Claude Desktop / Claude Code で使っている API キーは、同じ画面の「発行済みのキー」から無効化します。
← Shiftyasan Public API / MCP guide
Connect from Claude
Once connected, you can build and adjust schedules by asking — for example "Schedule 4 people across early, late and night shifts for the first week of September. Give a day off after each night shift, and share night shifts fairly."
Pick the one you use.
- Claude.ai (web) — no API key needed. Recommended
- Claude Desktop — one entry in a config file
- Claude Code — one command
Claude.ai (web)
What you need
- A Claude account — the free plan works too (free accounts can add one custom connector)
- A Shiftyasan account (sign-up available)
No API key needed — one is provisioned when you connect.
-
Open Customize → Connectors
Open Customize in Claude's left sidebar, then pick Customize → Connectors in the settings menu.
On Team and Enterprise plans an owner adds it first under Organization settings → Connectors; members then press "Connect" under Customize → Connectors.
Start from Customize in the sidebar. -
Add a custom connector
Press Add at the top right of the Connectors screen, choose Add custom connector, fill in these two fields and press Add.
Name Anything you like (for example Shiftyasan) — shown in the connectors listURL https://api.shiftyasan.com/mcpLeave OAuth Client ID and Secret under "Advanced settings" empty. Both are optional; Shiftyasan registers the client for you.
Leave OAuth Client ID and Secret empty, then press Add. -
Sign in to Shiftyasan
A sign-in page opens in your browser. Use your email and password, or Google.
The sign-in screen on api.shiftyasan.com. Google is the main route. -
Approve the connection
The approval screen shows which account you are signing in as and where the authorization will be sent. Check both, then approve.
⚠️ If the destination is unfamiliar, close the page without approving.
Check both the account you are signed in as and where the authorization goes. -
Try it
Schedule 4 people from September 1st to 7th across early,
late and night shifts. Always give a day off after a night
shift, and share night shifts as evenly as possible.
Claude Desktop
The rest of this section is the fallback for when that is not available: bridge with
mcp-remote. This route is the one that needs Node.js 20+ on your
machine.
It also needs an API key — issue one in the
dashboard first, then add this to
claude_desktop_config.json.
{
  "mcpServers": {
    "shiftyasan": {
      "command": "npx",
      "args": ["-y", "mcp-remote", "https://api.shiftyasan.com/mcp",
               "--header", "Authorization: Bearer sk_live_..."]
    }
  }
}
Restart Claude Desktop afterwards.
Claude Code
One command. This path needs an API key, so issue one in the dashboard first.
claude mcp add --transport http shiftyasan https://api.shiftyasan.com/mcp \
  --header "Authorization: Bearer sk_live_..."
Troubleshooting
I cannot find Connectors in Settings (Claude.ai)
Custom connectors are a paid-plan feature and do not appear on free plans. You can still connect from Claude Desktop or Claude Code using an API key.
The URL is rejected
Check for a trailing slash or stray whitespace. It is exactly
https://api.shiftyasan.com/mcp.
It connects, but never builds a schedule
Saying "use Shiftyasan" makes the tool call more likely. If required details are missing (dates, shift types, headcount, who can work which shift) the agent will ask — answer and it will proceed.
I set this up with the npm package before
Your @shiftyasan/mcp-server setup keeps working. Switching is
optional. The remote connection needs no Node.js, and updates happen on our side.
Revoking a connection
Revoke any connected app from the dashboard under "Connected apps". API keys used by Claude Desktop / Claude Code are disabled from "Your API keys" on the same page.